The menus let you quickly navigate around the application. You simply hover your cursor over the dropdown menus till you find the option that you're looking for, then click it.
For example, if you are an authorized approver who is looking at his/her own time card and you realize that you need to delegate your approval authority, you can get there in one click. Previous versions involved a series of exit actions to get to a main menu that listed all of your navigation options.
In general, the highest-level menu items correspond to major areas of the application. The lowest-level menu items correspond to tabs within those areas.
The images and items below describe all the places that you can go from the JAMIS e-timecard menus.
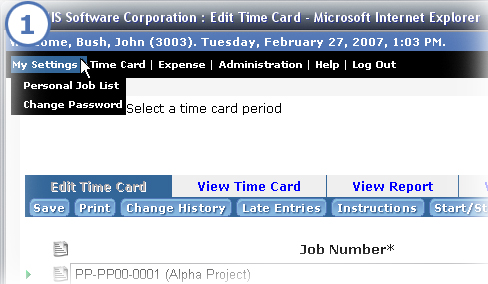
My Settings: Manage your personal job list, manage your combination pay codes if your company uses this feature, or change your password.
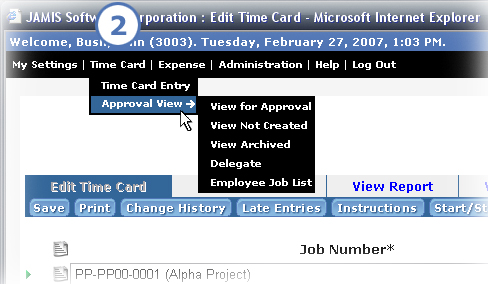
Time Card: Click Time Card Entry to go to your current time card. Or, if you are an authorized approver, select one of the following options under Approval View to go to the desired approval function.
Employee Job List (user-defined label). Your company setup determines whether this option appears.
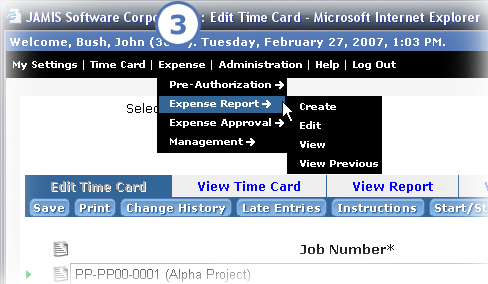
Expense. If your company uses e-xpense, you can select one of the following options.
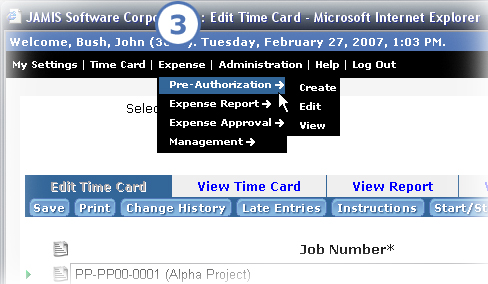
Expense Report, then select to Create, Edit, or View a current expense report, or select to View Previous archived reports.
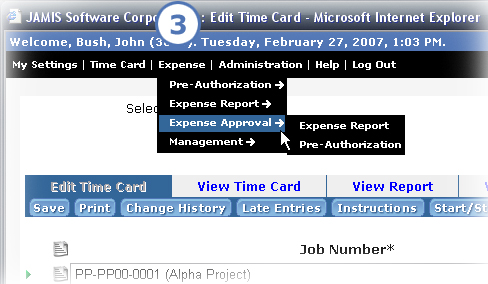
If you are an authorized e-xpense approver, select Expense Approval, then select whether to approve an Expense Report or a Pre-Authorization.
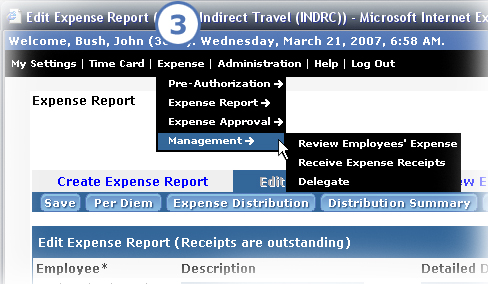
If you are an authorized e-xpense approver, select Management, then select one of these options: Review Employees' Expense (from archives), Receive Expense Receipts, or Delegate.
Administration: If you have appropriate permissions, you can select one of the following options.
Mass Enter Time Cards > Mass Enter Time Cards to enter current time cards for other employees.
Mass Enter Time Cards > Mass Amend Time Cards to review or change employee time cards that you reopen from the archives.
View Missing Time Cards to create a list of time cards that employees have not yet created.
Mass Enter Expenses to enter requests and reports for other employees.

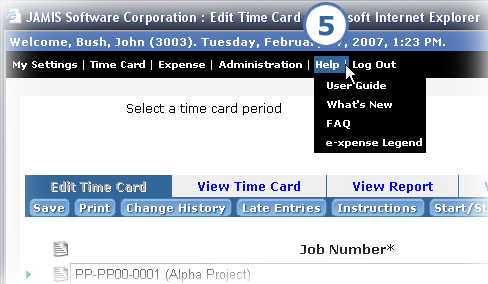
Help: View one of several online documents to help you use the JAMIS e-timecard application.
User Guide to view detailed instructions for entering and approving time and expense, which we have updated for this latest version.
What's New to open Getting to Know JAMIS e-timecard 6, which is the document that you are currently viewing.
FAQ to view the new frequently asked questions page.
e-xpense Legend to view descriptions of all the different images (links, buttons, etc.) on the request and report screens, including an explanation of the different colors/appearances of some of the images.
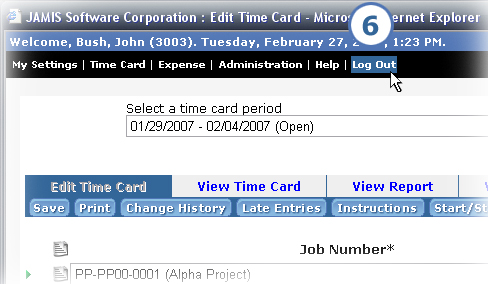
Log Out: End this JAMIS e-timecard session. In previous versions, you clicked one of the Exit buttons in the button bar. Note that there is no longer a Save & Exit e-timecard button, so you must click Save before you click Log Out if you want to save your time card changes.