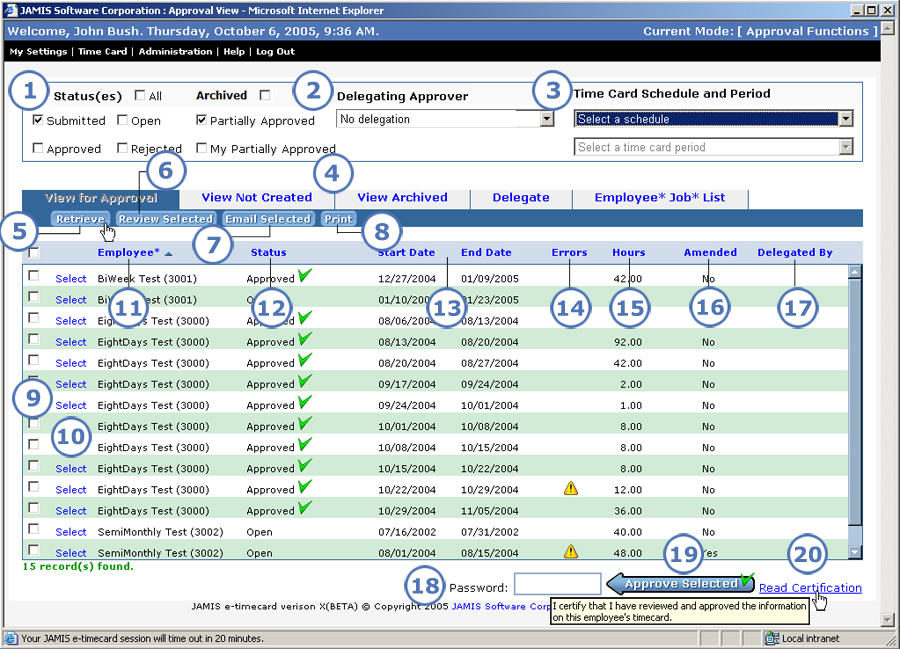
The Approval View screen lets you see a list of time cards that you are authorized to approve. It is the main page from which you begin the process of reviewing the time cards so you can approve or reject them on an employee-by-employee basis. Approval View is also where you can approve time cards in groups or all at once if your company's setup allows mass approval.
When you select Approval view from the Go to dropdown list during login, or when you select Time Card > Approval View > View for Approval from the upper-left of any application screen, the Approval View screen shown below appears.
|
This item... |
Is for this purpose... |
|
Click the check box for each time card status that you want to view time cards for, or click the All check box to view time cards for all statuses. When you access the Approval View screen, Submitted and Partially Approved are selected by default, and time cards for these statuses are already displayed. New! Prior to this version, you could either review all time cards regardless of status, or you could review time cards for only one status at a time. You could not select a custom group of statuses. New! Among the statuses that you can select is My Partially Approved, meaning time cards that have received at least one approval but less than the full number of required approvals, and you are one of the approvers who has approved them. To view these cards, you must also select the Partially Approved check box. If your company requires only one approval for each time card, then the Partially Approved and My Partially Approved check boxes do not appear. Your company's setup determines if you can approve time cards with an Open status. If you cannot approve open time cards, then you can still review or reject them. New! You can use the Archived check box in these ways to list archived time cards that you still need to approve:
|
|
Lets you select an approver who has delegated approval authority to you, so you can approve or reject time cards for his/her employees as if they were your own employees. When you select a delegating approver, you view that approver's set of time cards in addition to your own. The Delegated By column (see 17) helps you distinguish delegated time cards from your own. The list shows only those approvers who have delegated to you. If no approvers have delegated to you, then the list displays, "No delegation." New! To view all time cards that you are authorized to approve, including both your own time cards and those for all approvers who have delegated to you, select All approvers from the list. This option appears only if more than one approver has delegated to you. To return to viewing only your own time cards, select the Select a delegating approver option from the list. Prior to this version, you had to go to a separate screen either to select a delegating approver for viewing his/her employees' time cards or to return to viewing only your own employees' time cards. |
|
Lets you filter by schedule the time cards that you want to view for approval. First, select the time card schedule for which you want to view periods from the top dropdown list. When you do this, the bottom dropdown list displays a list of time card periods for the schedule; select one. To return to viewing time cards for all schedules, select the Select a schedule option from the top dropdown list. Prior to this version, you had to go to a separate screen either to select a time card schedule and period or to return to viewing time cards for all schedules. |
|
These tabs let you navigate around the different approval functions. They correspond to the selections under Time Card > Approval View in the upper-left of all application screens. Click one of the following tabs to go to the desired approval function.
|
|
After you select statuses (see 1) and/or a delegating approver (see 2) and/or a schedule and period (see 3), click Retrieve to change the list to display employee time cards that match your selections. |
|
After you click check boxes for time cards (see 9), click here to open them for approval/rejection. Either the View Time Card screen or the View Summary screen appears with the first listed time card among those that you selected. Prior to this version, you could review only one time card at a time; you could not create a review list. |
|
After you click check boxes for time cards (see 9), click here to email the employees who those time cards belong to. Your computer's email application opens an email window that includes your own address in the To field and the addresses of the employees who you selected in the Bcc field. In the Subject field, "Please submit your time card" defaults, but you can change it. |
|
Click to print the employee time card approval data. Approval View is one of many screens that now let you print data. Previously, the time card was the only screen that you could print from. |
|
Click the check box to the left of each time card:
Next, click Review Selected (see 6), Approve Selected (see 19), or Email Selected (see 7). Note that you can click the check box above the list to select all time cards on the screen. |
|
To review one time card for approval/rejection, click Select to the left of it. The time card opens on either the View Time Card screen or the View Summary screen. |
|
Name and ID of the employee who the time card belongs to. By default, the approval list is sorted in ascending order by employee last name. You can sort by any column heading, in either order:
|
|
Time card status, which corresponds to the selections that you can make under Status(es) described in 1 above. New! If you have already approved the time card, then you can see an |
|
Start and end dates for the time card period. Prior to this version, the list showed only the end date. |
|
If the time card contains any soft errors, then this column shows an |
|
The total number of hours on the time card. |
|
Some screens in e-timecard use the term "Amended" to refer to a time card that was changed after your company exported it to payroll. Basically, "amended" means, "changed since the last time that it was archived." |
|
If applicable, shows the approver who delegated this time card to you. See 2 above to find out how to select a delegating approver to view time cards for his/her employees. |
|
Your company's setup determines whether this field appears. If it does, enter the same password that you use to log into e-timecard, then click Approve Selected, which we describe below. Prior to this version, you had to enter your password for mass approval on a separate screen. |
|
Click here to approve all time cards that you clicked check boxes for (see 9). You can always use Approve Selected to approve time cards that you have already reviewed. Whether you can also use it to approve time cards that you have not reviewed depends on your company's setup. Approve Selected replaces and streamlines the previous, separate processes for approving time cards in groups or all time cards at once. |
|
If your company has special certification text that it wishes you to view before approving, you can click Read Certification to the right of the Approve Selected button to see it in a pop-up window. You can also view the text in the Read Certification tool tip. Prior to this version, the text was viewable on the separate approval screen that no longer appears in the new, streamlined process. |