Once you open a time card to review from the Approval View screen, you can approve or reject it.
In prior versions, you selected which time card view that you wanted to see from the main approval screen, and you had to go back there to select a different view. Now, you can quickly switch views while the time card is open. The view that the time card initially opens in depends on your company's setup:
If your company is set up to automatically display the View Summary screen when you open a time card for review, then you can always approve from this view.
If View Time Card automatically appears, then you must review the time card there or on the Edit Time Card or View Report screens before you can approve from the View Summary screen.
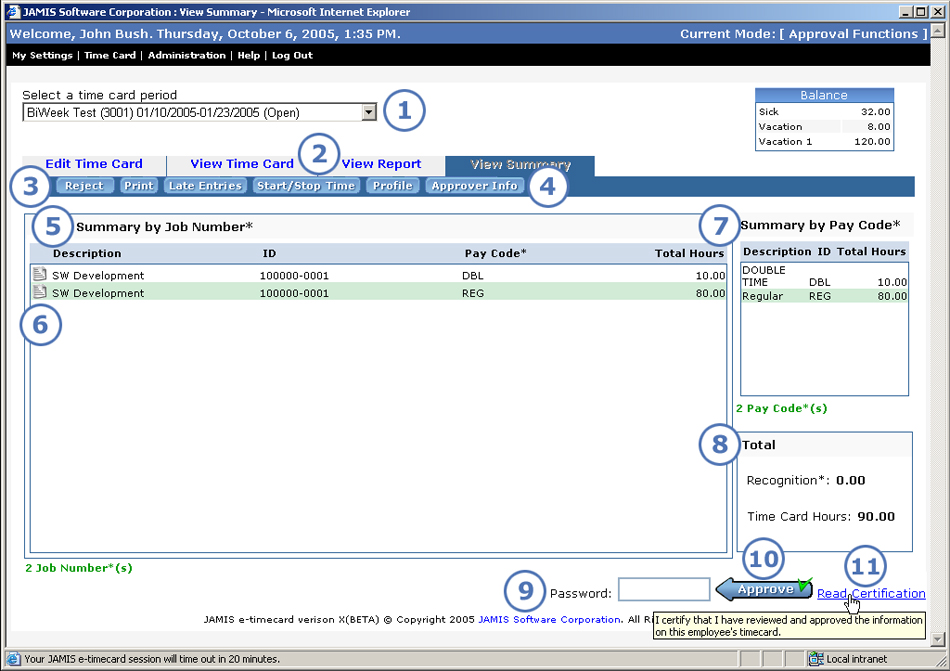
Below is an image of the View Summary screen, which is also available to employees viewing their own time cards, but without the Approve and Reject options. For approvers viewing employee time cards, the same Approve and Reject options that you see below also appear in the other three time card views.
|
This item... |
Is for this purpose... |
|
If you want to review a different time card that you selected on the Approval View screen, select it from the dropdown list. This lets you move among the time cards that you selected to review. The list shows the employee name and ID, period dates, and status for each time card. The order in which the time cards appear depends on how you sorted the list on the Approval View screen; by default, it's sorted by employee last name. If you selected only one time card to review, then that is the only time card shown in the Select a time card period dropdown list. New! If the time card is archived, you can see that to the right of the time card's status. |
|
These let you select whether you want to edit or simply view the employee time card, as well as how you would like to view the time card data. You have these options:
|
|
Click here if you need to reject the time card. |
|
This is where you go when you want to print the employee time card or view a variety of information that is not available on the main time card screen. Note that not all of the buttons listed below always appear. For example, if the employee has no errors on the time card, then there is no Errors button. All options that do appear, however, are available on all time card views, unlike in prior versions.
Several of these options were previously available on the main approval screen, but are now only on the time card. |
|
A summary of the time card, sorted by either job description or ID, depending on your company's setup. You can see the pay code and total hours for each job line, plus a count of the number of different jobs on the time card. |
|
If you see this icon: If you see this icon: While reviewing the instructions, you can also view more information about the job, including a detailed description and the org9. Prior to this version, job instructions were not accessible from the time card summary by job. |
|
A summary of the time card by pay code description. You can see the total hours for each pay code, plus a count of the number of different pay codes on the time card. |
|
The total time card hours, plus the total recognition pay hours if applicable. |
|
Your company's setup determines whether this field appears. If it does, enter the same password that you use to log into e-timecard, then click Approve, which we describe below. Prior to this version, you had to enter your password for approval on a separate screen. |
|
Click to approve the employee time card. The approval is instant, with a message at the top of the screen confirming your success, unlike prior versions that brought you to a separate screen where you clicked OK. The screen that the message appears on depends on whether you selected one time card or multiple time cards to review on the Approval View screen.
|
|
If your company has special certification text that it wishes you to view before approving, you can click Read Certification to the right of the Approve button to see it in a pop-up window. You can also view the text in the Read Certification tool tip. Prior to this version, the text was viewable on the separate approval screen that no longer appears in the new, streamlined process. |