If you are going to be absent when employees submit time cards or expenses, you may need to delegate your approval authority to another, authorized approver. You determine the valid time period for the delegation.
If needed, you can delete a delegation after you create it, which stops the delegation immediately. You can also change some details about an existing delegation.
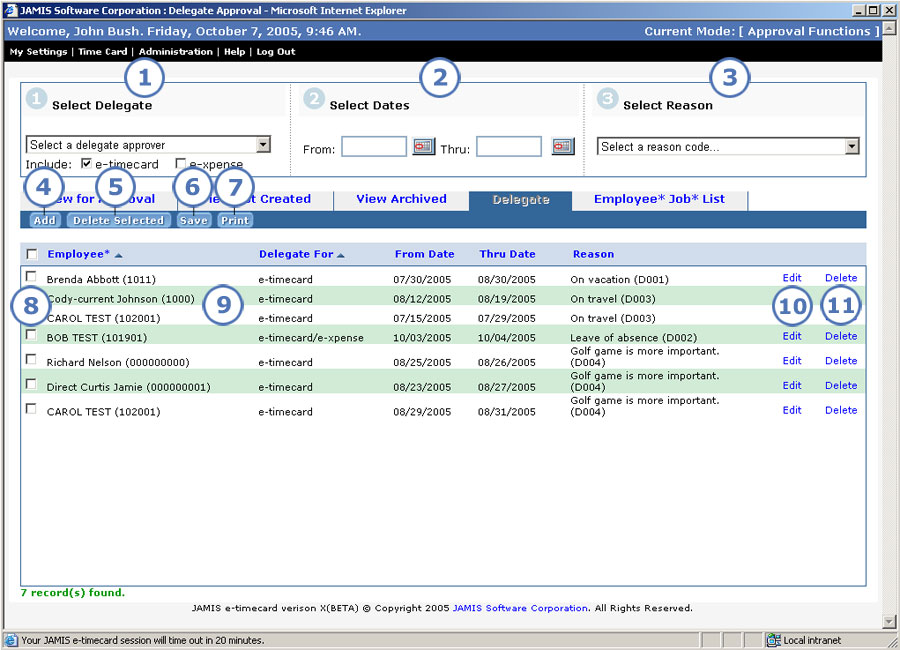
To access the Delegate Approval screen shown below:
From the upper-left corner of any application screen, click Time Card > Approval View > Delegate, or click Expense > Management > Delegate.
From any e-timecard approval screen, click the Delegate tab.
From any e-xpense approval management screen, click the Delegate tab.
|
This item... |
Is for this purpose... |
|
Select the approver who you want to delegate to. If you do not see the approver who you are looking for, select Search to look up. If you see Include check boxes, then you can indicate the application(s) that the delegation applies to. Click the e-timecard and/or e-xpense check boxes. |
|
Enter the from and through dates for the delegation. You can enter dates manually or click |
|
Select the reason why you are delegating your authority from the dropdown list. If you did not know the correct delegation reason code in previous versions, then you had to look it up on a separate screen. |
|
Click here after you make selections in items 1 through 3. The system adds your delegation to the top of the delegation list (see 9). It also clears the fields in the top section of the screen to let you create another delegation if you wish. To finish adding the delegation, you must click Save (see 6). |
|
After you click the check boxes for the delegation records that you want to delete (see 8), click here. To finish deleting the delegations, you must click Save (see 6). In previous versions, you could delete only one delegation record at a time. |
|
Click here to finish your approval delegation add, delete, or change. This step is required to commit your actions to the database. |
|
Click to print the delegation list. This is one of many screens that now let you print data. Previously, the time card was the only screen that you could print from. |
|
To delete more than one delegation record, click the check box to the left of each delegation that you want to delete, then click Delete Selected (see 5). |
|
The screen displays all approval delegations that you have made, in ascending order by employee last name. You can sort the list differently by clicking the appropriate column heading once or twice. If you have made more delegations than can fit on the screen, then you must scroll to see them all. In previous versions, the screen did not automatically display your delegation history. You had to enter selection criteria if desired, then click Retrieve. |
|
Click Edit to the right of the delegation record that you want to change. The Edit link changes to Update, and these fields become editable: Delegate For, Thru Date, Reason. After you make changes to the delegation record, click Update to apply them. To finish changing the delegation, you must click Save (see 6). |
|
Click Delete to the right of the delegation record that you want to delete. To finish deleting the delegation, you must click Save (see 6). |