If your company's setup allows, you can update the personal job list for any employee whose time cards you are authorized to approve. This can include adding jobs from the company master to the employee's list, deleting jobs from the employee's list, or copying jobs from one employee's list to another.
To access the Manage Personal Job List (user-defined label) screen shown below:
From the upper-left corner of any application screen, click Time Card > Approval View > Employee Job List (user-defined label).
From any e-timecard approval screen, click the Employee Job List (user-defined label) tab.
If your company's setup does not allow access to employee personal job lists, then these options do not appear.
In previous versions of JAMIS e-timecard, you could not select to manage employee job lists from other approval screens. You had to go back to the main menu to select the option for managing employee job lists.
|
This item... |
Is for this purpose... |
|
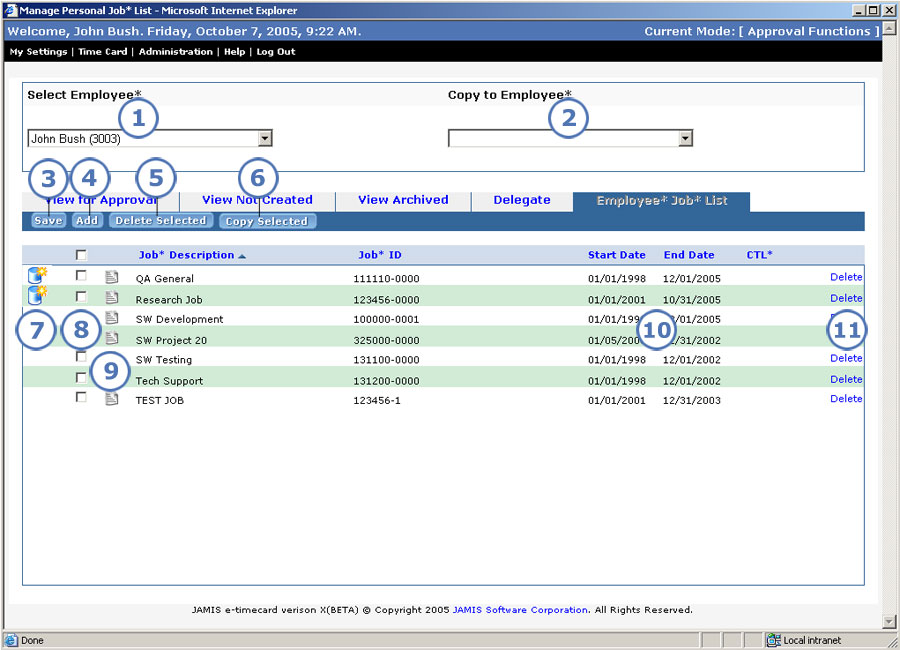
Select the employee whose personal job list you want to manage. If the list of employees who you are authorized to approve is too large to fit in the dropdown list, and you do not see the employee who you are looking for, select Search to look up the employee. |
|
If you want to copy jobs from one employee's list to another, first select the employee to copy from (see 1), then select the employee to copy to in this field. If necessary, select Search to look up the employee. Next, select jobs to copy (see 8), then click Copy Selected (see 6). |
|
Click here to finish your job list additions or deletions. This step is required to commit these actions to the database, but you do not have to click Save to copy job lists. |
|
Click here to look up jobs from the company master for adding to the employee's personal list. When you select jobs from the master and return to the Manage Personal Job List screen, those jobs appear in the list (see 7). To finish adding the jobs to the employee's list, you must click Save (see 3). When you wanted to add jobs to the employee's list in previous versions, you first had to click New, then either enter jobs manually, or click another button or icon to access the company master. |
|
After you click the check boxes for the jobs that you want to remove from the employee's list (see 8), click here. To finish deleting the jobs, you must click Save (see 3). In previous versions, you could delete only one job from the employee's list at a time. |
|
After you select the copy from (see 1) and copy to (see 2) employees and check the boxes for the jobs that you want to copy (see 8), click here to finish copying jobs from one employee's list to another. You do not have to click Save to commit your copy action. The system automatically saves the copied jobs to the receiving employee's list in the database. In previous versions, you had to go to a separate screen to copy jobs between personal lists. Rather than selecting jobs from the original employee's list to copy, you had to enter the jobs manually or retrieve them from a lookup screen. |
|
After you select jobs from the company master (see 4) and return to this screen, those jobs appear in the list with this icon to the left of them. Once you click Save (see 3), the icons disappear, indicating that the jobs are saved to the employee's list in the database. |
|
You can use the check boxes to do either of the following.
|
|
If you see this icon: If you see this icon: While reviewing the instructions, you can also view more information about the job, including a detailed description and the org9. Note that you may be required to enter instructions in order to save a job to the employee's list. |
|
In addition to the job code and description, you can see the job start and end dates. Whether the screen shows the cost element or contract labor category depends on your company's setup. |
|
Click Delete to the right of the job that you want to remove from the employee's list. To finish the deletion, you must click Save (see 3). |