The Edit Pre-Authorization Request screen is where you enter data about the expense that you are planning to incur. You can change the data on a request at any time until it is fully approved.
Do one of the following to access the Edit Pre-Authorization Request screen.
From the Create Pre-Authorization Request screen, click Create next to the form from which you want to base the request.
When you log in, select Edit a request from the Go to dropdown list.
From the upper-left corner of any application screen, click Expense > Pre-Authorization > Edit.
From any pre-authorization request screen, click the Edit Pre-Authorization tab.
If you access this screen by any of the above methods except for the first, your request with the lowest request number automatically opens. If you want to work on a different request, you can select it from the Pre-Authorization Request dropdown list (see 2).
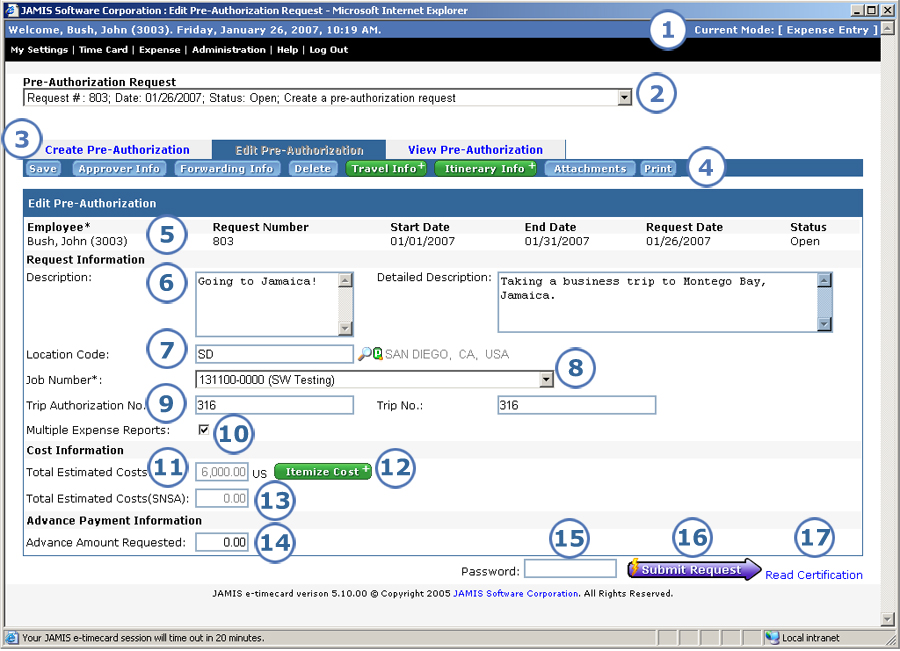
The image below of the Edit Pre-Authorization Request screen shows the most common fields for a travel request. You may see different fields, depending on your administrator's settings and if you are entering a materials or education request.
|
This item... |
Is for this purpose... |
|
The upper-right of the screen tells you the area of the application that you are working in. When you are working on a pre-authorization request or expense report, you will see: Expense Entry. |
|
Here you can see all of your available pre-authorization requests, meaning any requests that you have entered that have not yet been archived. They are sorted in ascending order by request number. To edit a different request, select it from the dropdown list. The dropdown list shows the following data for each request: request number; created date; status; brief description. In previous versions, you had to exit back to a selection menu in order to select a different request to edit. |
|
These tabs let you quickly move among your different options for pre-authorization requests. You are currently in the Edit Pre-Authorization tab. From here, you can click:
|
|
This is where you go when you want to save or print your request or enter/view a variety of information that is not available on the main request screen. Not all of the buttons listed below always appear. For example, if your company does not allow itinerary entry, then the Itinerary Info button does not appear.
The button images for Travel Info, Itinerary Info, and Attachments change to green with a plus sign (+) when you enter data or attach files under them. Note that the old request screen had a row of links followed by a row of buttons, all at the top of the screen. The following options that previously appeared in that area are now on other parts of the screen: log out (exit), help, and submit (see 16). |
|
This is where you see general information about your pre-authorization request. All of the following are read-only unless otherwise noted.
|
|
You are required to enter a brief description of the expense for which you are requesting authorization. If you wish, you can also enter a detailed, longer description. In previous versions, you had to click a button and go to a separate screen to enter a detailed description. |
|
You can enter a location code to identify the area from which to obtain per diem rates. e-xpense uses your entry here as the default for each date on the report. If your administrator set up per diem defaults for the form, then e-xpense uses the location to fill in the cost per day/unit for each applicable category on the Itemize Cost Details screen. You can look up a location code by clicking New! To review detailed information and per diem rates for a location code that is already on the request, click |
|
This is the prime job that you will use on the report. Depending on your administrator’s settings, you may be required to enter a job in order to save the request. Do one of the following to enter a job.
|
|
These are optional fields for travel requests. Ask your administrator if you should make entries. |
|
This check box appears if you are entering a travel request for a form that is set up to allow multiple reports. Click it if you plan to enter multiple reports for this request. |
|
Here you can enter the total amount that you plan to spend. Or, you can click Itemize Cost (see 12) to break down your estimated expenses by categories. In the latter case, e-xpense fills in the Total Estimated Costs field based on the itemized details that you enter, and you can still edit the total estimated costs if you wish. |
|
Click here to break down your estimated expenses by categories. When you enter itemized cost data, this button image changes to green with a plus sign (+). |
|
If you enter Saturday Night Stay Analysis (SNSA) data when you itemize costs, then e-xpense calculates the total SNSA estimated costs and fills in this read-only field. |
|
You can enter an advance amount here if you wish. e-xpense will default this amount to the report and deduct it from the total that you will be reimbursed. Note that depending on your administrator's settings, some forms may not allow you to request an advance amount. |
|
If this field appears, enter your password before you click Submit Request. This is the same password that you use to log in. In previous versions, you had to go to a separate screen to enter your password. |
|
Click here when you are ready to submit your pre-authorization request to your approvers. |
|
If your company has special certification text that it wishes you to view before submitting, you can see the text by clicking Read Certification or by viewing the tool tip for the Submit Request button. |