The Edit Expense Report screen is where you enter data about the expense that you have incurred. You can change the data on a report at any time until it is fully approved. Exception: Your administrator may set up the form to prohibit changes to submitted reports.
Do one of the following to access the Edit Expense Report screen.
From the Create Expense Report screen, click Create next to the request or form from which you want to base the report.
When you log in, select Edit an expense report from the Go to dropdown list.
From the upper-left corner of any application screen, click Expense > Expense Report > Edit.
From any expense report screen, click the Edit Expense Report tab.
If you access this screen by any of the above methods except for the first, your report with the lowest report number automatically opens. If you want to work on a different report, you can select it from the Expense Report dropdown list (see 2).
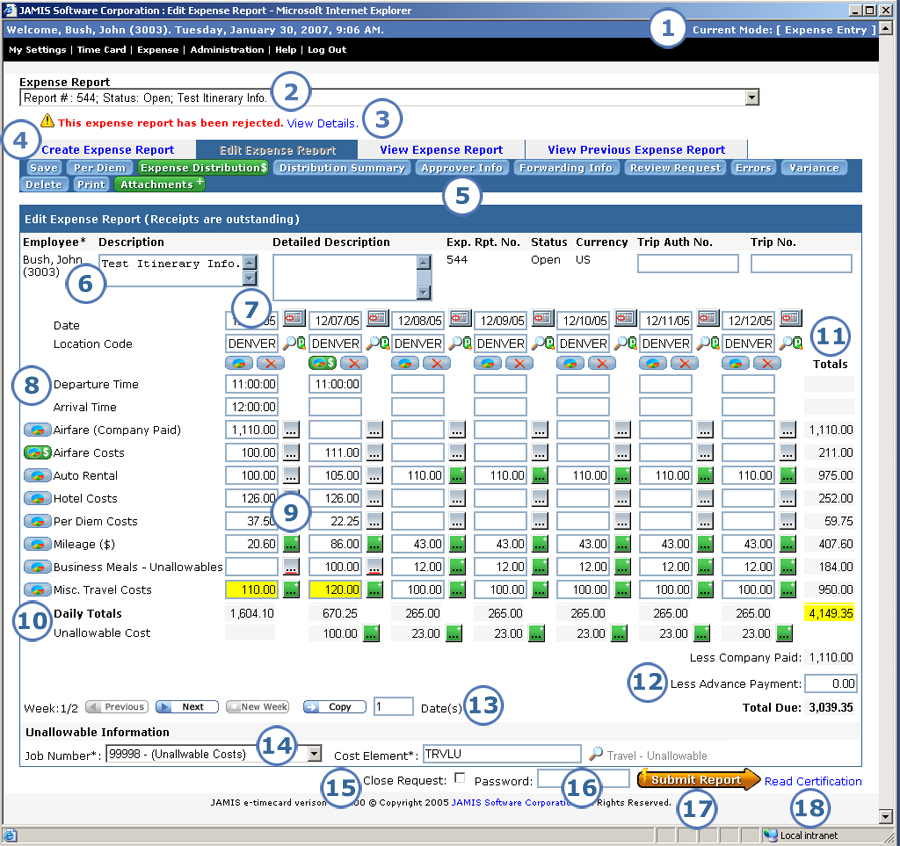
The image below of the Edit Expense Report screen shows the most common fields for a travel report. You may see different fields, depending on your administrator's settings and if you are entering a materials or education report.
|
This item... |
Is for this purpose... |
|
The upper-right of the screen tells you the area of the application that you are working in. When you are working on a pre-authorization request or expense report, you will see: Expense Entry. |
|
Here you can see all of your available expense reports, meaning any reports that you have entered that have not yet been archived. They are sorted in ascending order by report label, then by report number. To edit a different report, select it from the dropdown list. The dropdown list shows the following data for each report: report label; report number; status; brief description. In previous versions, you had to exit back to a selection menu in order to select a different report to edit. Note that the form's setup determines whether you can edit an expense report that you have already submitted. |
|
An alert to let you know that an approver rejected this report. To view details about the rejection, you can either click the View Details link to open a Reject Information window, or hover your cursor over it to view the tool tip. You will have to change the report to make it suitable for approval. |
|
These tabs let you quickly move among your different options for expense reports. You are currently in the Edit Expense Report tab. From here, you can click:
|
|
This is where you go when you want to save or print your report or enter/view a variety of information that is not available on the main report screen. Not all of the buttons listed below always appear. For example, if you do not have any errors on your report, then the Errors button does not appear.
Note that the old report screen had a row of links followed by a row of buttons, all at the top of the screen. The following options that previously appeared in that area are now on other parts of the screen: log out (exit), help, legend, and submit (see 17). If any of the expense items on the report require receipts, then you can see whether receipts are still outstanding on the line below the button bar. |
|
This is where you see and enter general information about your expense report.
|
|
Here you enter data for a specific date.
|
|
Here you view and enter data for an expense category. Your administrator determines which categories appear on the report.
|
|
To enter more details for any expense item or to calculate for a mileage category, click |
|
An amount appears in the Unallowable Cost row for each day that contains an unallowable entry. You can click |
|
As you enter amounts on your report, e-xpense automatically calculates totals for each category row, the entire report, and the total due. The totals are read-only. Prior to this release, e-xpense calculated totals only when you saved or submitted. |
|
If you have already received payments, e-xpense deducts these amounts from the total that you will be reimbursed:
|
|
If you incurred expenses on more than seven dates, click New Week to add seven more blank date columns. You can use the Previous and Next buttons to move between weeks of your report. In previous versions, you entered the number of dates that you wanted to add, then clicked Add. The New Week feature saves you a step. Also, you had to scroll horizontally to view additional weeks instead of clicking Previous and Next. As a shortcut, you can enter the number of dates to which you want to copy, then click Copy. e-xpense copies the amounts from the last date for which you made entries into the fields for the new dates. You can modify the data as necessary. |
|
Your administrator’s settings determine whether Job Number and/or Cost Element (user-defined labels) fields appear in this area. Values may default into these fields, and you may or may not be able to change the defaults. If a value doesn’t default for either field, then you may be required to enter one in order to submit the report. If either field is editable, you can select from the Job Number dropdown list or click |
|
If you are submitting a travel report for a request that is set up to allow multiple reports, then this check box appears. If this is the final report for this trip, click this check box to close the request on which it is based. Note that after you submit the report, if needed you can open the request to close it from there. In previous versions, you had to go to a separate screen to close the request while submitting the report. Note that depending on your administrator’s settings, an Individual Trip check box might appear to the right of Close Request. Click Individual Trip if you are submitting a report for a request that is set up to allow multiple reports, but this report is for an individual trip, meaning that it is not part of one, larger trip. |
|
If this field appears, enter your password before you click Submit Report. This is the same password that you use to log in. In previous versions, you had to go to a separate screen to enter your password. |
|
Click here when you are ready to submit your expense report to your approvers. |
|
If your company has special certification text that it wishes you to view before submitting, you can see the text by clicking Read Certification or by viewing the tool tip for the Submit Report button. |