e-timecard now consolidates all mass entry selection functions onto two screens: one for current time cards that we describe here, and another for archived time cards. Previously, there were four different screens for selecting current time cards that separated selection by end date or employee and entry of unapproved or pre-approved time cards.
Your choice to enter a time card period end date depends on whether you want to enter one time card or multiple time cards for an employee.
Enter an end date for one time card: When you click Retrieve, e-timecard searches for a time card that matches your criteria. If it finds one, then it instantly opens it on the Edit Time Card screen. This is the equivalent of the old e-timecard's process for selecting a mass entry time card by end date.
Leave the end date blank for multiple time cards: When you click Retrieve, e-timecard searches for time cards for the employee. If it finds one or more, then it instantly opens the current time card on the Edit Time Card screen and gives you the option to move among the employee's time cards. This is the equivalent of the old e-timecard's process for selecting a mass entry time card by employee.
If your company's setup allows, you also have the option of entering an org9, leaving the employee blank, then clicking Retrieve List to see all employees for the org9.
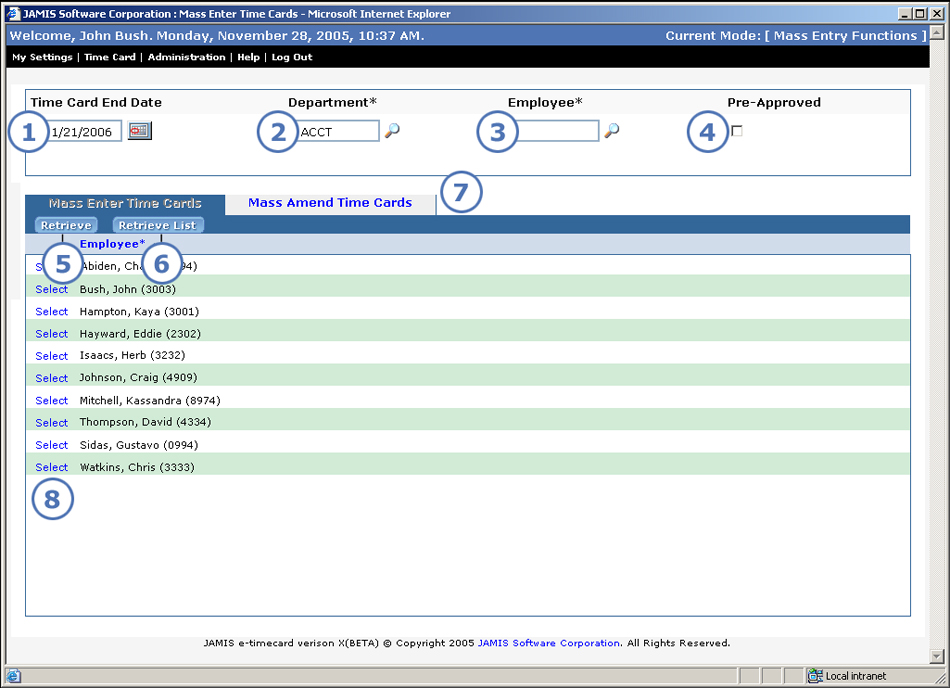
Below is an image of the Mass Enter Time Cards screen, which you can access by selecting Mass enter time cards from the Go to dropdown list while you log in, or by clicking Administration > Mass Enter Time Cards > Mass Enter Time Cards from the upper-left corner of any e-timecard application screen.
|
This item... |
Is for this purpose... |
|
Enter the time card period end date to enter one specific time card for an employee, or leave the field blank to automatically open the current one. You can enter the date manually or click |
|
Enter the org9 that the employee whose time you want to enter belongs to. You can look up an org9 by clicking Depending on your company’s setup, you may be required to enter an org9 in order to retrieve time cards, or the org9 may be optional. |
|
Entering an employee is required if you want to click Retrieve (see 5) and automatically open that employee's time card. Depending on your company's setup, you may be able to click If the screen displays a Retrieve List (see 6) button, then you can leave the employee blank and retrieve a list of all employees for an org9. Note: Time card mass entry no longer has an option for you to select the employee status as a criterion for retrieving time cards. Now, e-timecard retrieves all time cards that match your criteria, regardless of employee status. |
|
To enter an unapproved time card, leave this box unchecked. To enter a pre-approved time card, click this check box. If you are allowed access to only one type of time card, then you cannot change whichever option is pre-filled in this field. Prior to this version, you selected unapproved and pre-approved time cards on separate screens. This new check box lets you retrieve either type of time card from the same screen. |
|
After you select criteria as described in 1 through 4, click Retrieve if you entered an employee. This automatically opens a time card that matches the criteria that you entered. The Edit Time Card screen displays either the time card for the employee and period that you entered, or the current time card for the employee if you left the period blank. |
|
After you select criteria as described in 1 through 4, click Retrieve List if you entered an org9 and left the employee blank. This lists all employees for the org9 that you entered. See 8 for your next step. |
|
These tabs let you switch between the two different mass entry selection screens. They correspond to the selections under Time Card > Administration > Time Card Mass Entry in the upper-left of all application screens. Prior to this version, you had to exit back to a menu screen to access a different mass entry selection screen. To retrieve archived employee time cards, click the Mass Amend Time Cards tab. |
|
Click Select to the left of the employee for whom you want to enter time. The Edit Time Card screen displays either the time card for the end date that you entered, or the current time card for the employee if you left the period blank. |