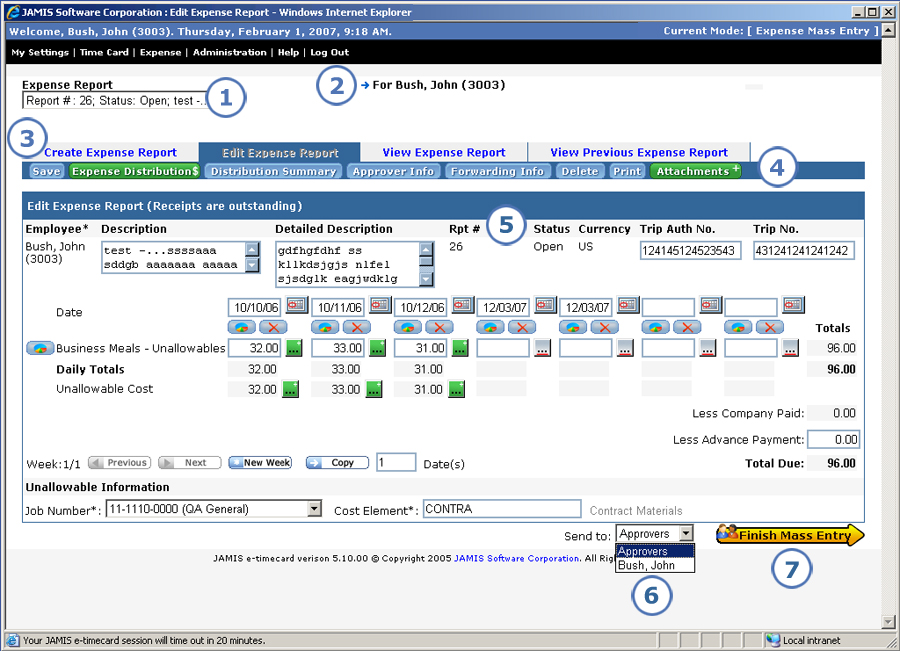
The Edit Pre-Authorization Request screen is where you enter data about the expense that the employee is planning to incur. The Edit Expense Report screen is where you enter data about the expense that the employee has already incurred and is now seeking reimbursement for.
Below we show an image of the Edit Expense Report screen for group expense keepers. The descriptions that follow it, however, cover items on the Edit Pre-Authorization Request screen for group expense keepers as well.

Here we describe only those parts of the screens that are specific for mass entry. See the employee descriptions of the Edit Pre-Authorization Request and Edit Expense Report screens to find out about all areas of the request and report.
|
This item... |
Is for this purpose... |
|
Here you can see all of the employee's available pre-authorization requests or expense reports, meaning any requests/reports for the employee that have not yet been archived. They are sorted in ascending order by request number or report number. To edit a different request or report, select it from the dropdown list. For each request or report, the list shows the request/report number; created date (requests only), status, and brief description. In previous versions, you had to exit back to a selection menu in order to select a different request or report to edit. |
|
You can see the name and ID of the employee for whom you are entering expenses. Your own name and ID appear at the top of the screen. |
|
These tabs let you quickly move among your different options for the employee's pre-authorization requests or expense reports. You are currently in either the Edit Pre-Authorization or Edit Expense Report tab. From here, you can click:
|
|
This is where you go when you want to save or print the employee's request or report or enter/view a variety of information that is not available on the main request or report screen. |
|
Here you enter data about the employee's planned expenditure or about his/her incurred expenses. |
|
When you are finished making entries on the request or report, this is where you indicate to whom you want to send it. Select one of the following options.
Prior to this version, you had to go to a separate screen to indicate where you wanted to send the request or report. |
|
Click here to finish sending the request or report to the employee or approvers. After you click Finish Mass Entry, e-xpense returns you to the Mass Enter Expenses screen. From there, you can select an employee for mass entry. If you entered an org9 on this screen, then it still appears, and if you retrieved multiple employees for an org9, then the list is still available for you to select from without having to perform another search. |