The Receive Receipts dialog box shown below appears when you do one of the following.
From the Receive Expense Receipts screen, click Select to the left of the report for which you want to receive receipts.
From the expense report, click Receive Receipts.
|
This item... |
Is for this purpose... |
|
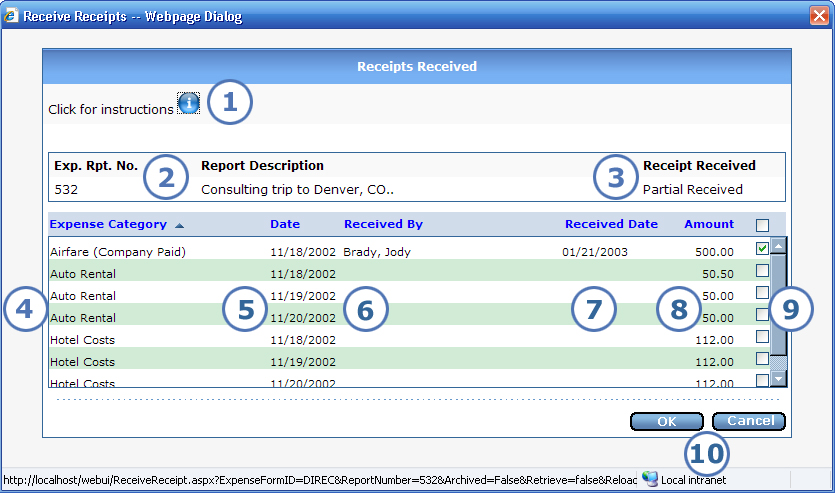
To view on-screen instructions for receiving receipts, you can either click the |
|
The report number and description for the expense report that you are receiving receipts for. |
|
This shows you whether the report has had no, some (partial), or all receipts received. |
|
The expense category for the item that requires a receipt. By default, the list of expense items is sorted in ascending order by category, and then in ascending order by date. You can sort by any column heading, in either order:
|
|
The date on which the employee incurred the expense for which a receipt is required. It is the combination of the category and date that equals each expense item that requires a receipt. |
|
If a receipt has already been received for this item, then you can see the receiving approver's name here. |
|
If a receipt has already been received for this item, then you can see the date when it was received here. |
|
The amount that the employee entered for the item that requires a receipt. If you scroll to the bottom of the list of expense items, you can see the total for all items on the report that require receipts. |
|
To acknowledge that you have received receipts, place a check to the right of each expense item for which you have received receipts. If you previously indicated that you received receipts for an item in error, you can uncheck the item. As a shortcut, you can click the check box above the list to check all expense items for this report. From there, you can click OK to receive all receipts for the report, or uncheck boxes as needed before clicking OK. |
|
Click OK to save your receipt changes and return to the previous screen. If that screen is Receive Expense Receipts, then the reports that you retrieved are still displayed for you to select another report for receiving receipts. To exit the screen without saving any receipt changes that you made since opening it, click Cancel. |