Your company uses reasons/explanations to keep an audit trail. Your administrator’s settings determine the circumstances that require you to supply reasons/explanations for time card changes: never, when changing any saved data, only when changing a submitted time card, or only when changing an archived time card.
Previously, you had to select a reason at the time of each change, and if your selection required an explanation, you had to click OK on a message screen that informed you of this, then enter the explanation on another screen after that. So, two time card changes could result in up to six screens of reason/explanation selection.
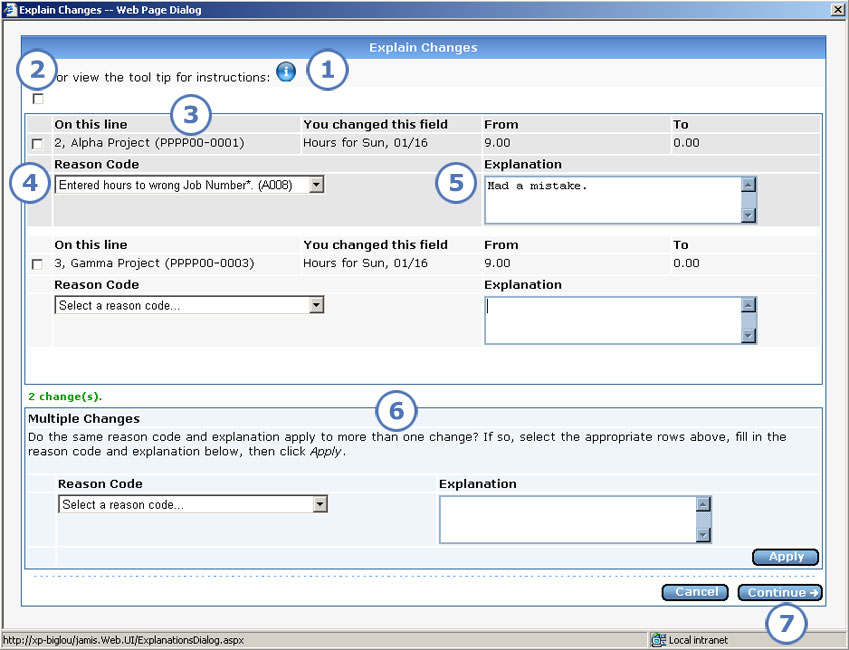
In this version, the process for selecting reasons/explanations is streamlined. Now, when you save or submit, you enter reasons/explanations on the one screen shown below for all changes that you've made since you last saved or opened the time card.
|
This item... |
Is for this purpose... |
|
To view on-screen instructions for explaining changes, you can either click the |
|
These let you select multiple changes for applying the same reason code and explanation. See the description of the Multiple Changes section in 6 below. |
|
The display-only data that you can see for each time card change includes: item, identified by line number and job number; the field that you changed; old (from) value; and new (to) value. |
|
Select the appropriate reason code from the dropdown list. In previous versions, you had to scroll through a list of change reason codes, then click OK on the line for the appropriate one. |
|
If "(explain)" appears to the right of the reason code that you selected, then you must type specific details about the change here. Otherwise, the explanation is optional. |
|
You can apply the same reason code/explanation to multiple time card changes. Click the check box (see 2 above) for each time card change row that you want to apply the same reason code/explanation to, or click the check box above the rows to select all time card changes on the screen. Select the reason code and type the explanation here in the Multiple Changes section, then click Apply. |
|
Click to save your time card changes and your reason codes/explanations. |
Although this topic uses the Explain Changes screen to demonstrate selecting reasons/explanations, the process for selecting reasons for late time card entries is the same. Your company's setup determines whether you must supply reasons for late entries.